Golang: Database Migration Using Atlas and Goose

Photo by Josh Willink on Pexels
Database migration is an essential part of software development. Over time, as business requirements change, so does the structure of our data along with it. We can categorize database migration into two (2):
- Schema Migration: Mostly required by SQL databases to update the predefined schema (add a new column, change the type of an existing column, make the column non-nullable, remove a column, etc). Document-based databases don't require schema-migration because they are schema-less.
- Data Migration: Changes to the database that involve changes to the data/records and not the schema e.g moving data from one table to another or from one database to another or even filling up empty columns/keys due to new requirements etc.
Most migration tools focus on schema migration. There are a lot of migration tools out there for database migrations in Golang:
- Gorm's Automigrate
- golang-migrate
- Tern
- Goose
- Atlas
- gormigrate
Each one is quite powerful in its own way. In this article, we will use Gorm to define our database models for a blogging application and we will look at how to combine Atlas and Goose to support schema and data migrations in our application.
Prerequisites
- Golang (I used version 1.21.3 for this article) Installed
- Docker and Docker Compose Installed
- An IDE (VsCode, Goland etc)
- Basic understanding of Golang
- Basic understanding of Docker and Docker compose
- Basic understanding of SQL
Introduction to Atlas and Goose
One very simple description for Atlas is "Terraform for databases". For those of us not familiar with Terraform, Atlas is a migration tool that allows you to define the desired state of your database and it will plan the changes required to get your database from its current state to the desired state, it can also apply those changes to your database.
Atlas supports two approaches to database migration: the declarative approach and the versioned approach. In the declarative approach, you specify the desired state of the database and Atlas plans and transforms your database to the desired state. In the versioned approach, changes to the database are stored as versioned files that are applied in order. A versioned file is simply just an SQL file that defines the series of SQL statements that will be executed on the database. So instead of just updating the desired state of your database and having Atlas plan and transform your database, when you make a change to your database, Atlas will plan the SQL statements that need to be executed to get the database from the current state to the desired state and it stores those statements in an SQL file and tags it with a version. The file can then be executed on the database, if another change is made to the desired state, Atlas will again generate another SQL versioned file and store it. This way you can see all the changes that have been applied to the database over time. I prefer the versioned approach, this makes it possible to check the generated plan (version) into version control and allows the team to review the changes that would be applied to the database before they are applied.
Goose is also a migration tool that supports versioning of changes to the database. It supports two formats of migration files (SQL and Go) and I chose Goose for this article, for this reason. With Goose we can perform schema migration using SQL and then perform data migration using Go. This makes it possible to nicely order all operations (both schema changes and data changes) executed on the database and ensure they happen in order. Goose, unlike Atlas, does not support automatic planning. It is unable to detect the state changes to your database therefore everything has to be done manually.
So for this article, when we want schema migration, we use Atlas to detect and plan the operations required to get the database to the desired state and output that plan as an SQL versioned file, and when we want data migration, we use Goose to create a new Golang migration file. This is possible because Atlas has good support for Goose and Atlas can generate migration files in a format that goose understands. We also use Goose to apply our migration files to the database.
If you are only interested in seeing the code you can find the whole thing here and if you'd like to follow along, keep reading.
Step 1 - Install Dependencies
Let's start by creating a basic folder structure and installing dependencies. Create your application folder
$ mkdir atlasgoose
Change into the application folder and initialize your go module.
$ cd atlasgoose
$ go mod init [modulename]
replace [modulename] with the name of your choice. For me it's github.com/Shaibujnr/atlasgoose .
Install dependencies:
$ go get -u github.com/pressly/goose
$ go get -u gorm.io/gorm
$ go get -u ariga.io/atlas-provider-gorm
$ go get -u github.com/brianvoe/gofakeit/v6
We have installed:
- Goose: Our database migration tool
- Gorm: An ORM for defining database models. We would use it to define the desired state of our database.
- atlas-provider-gorm: This allows Atlas to identify states from Gorm models.
- gofakeit: To generate fake blog posts.
Now you can open your application in your favorite IDE.
Step 2 - Define Database Models
We want to design database models for a simple blogging application. The app will allow users to post blog articles and every blog post must have a unique title across the entire system (why? No reason🙃.)
Create a package models and create models.go in our package. Define the following in models.go :
package models

import "gorm.io/gorm"

type User struct {
    gorm.Model
    FirstName string     `gorm:"column:first_name;not null"`
    LastName  string     `gorm:"column:last_name;not null"`
    Email     string     `gorm:"column:email;not null;unique"`
    BlogPosts []BlogPost `gorm:"foreignKey:UserID;references:ID"`
}

type BlogPost struct {
    gorm.Model
    Title   string `gorm:"column:title;not null;unique"`
    Content string `gorm:"column:content;not null"`
    UserID  uint   `gorm:"column:user_id;not null;"`
}
We defined the User and BlogPost models. We embedded gorm.Model in each model to provide us with ID (primary key), CreatedAt, UpdatedAt and DeletedAt columns. We also used struct tags to further specify the name of each column, if it’s nullable or not, foreign key and unique constraints as well.
We have a one to many relationship between User and BlogPost just basic stuff.
Step 3 - Generate Migration Version With Atlas
Now we have defined our database models using Gorm. These models represent the desired state of our database and we need to get our database to this state. We need Atlas to plan and generate the migration file that will create the users and blog_posts tables when applied. But we don’t even have a database🥲.
For Atlas to generate a plan, it needs 2 (two) states, the current state and the desired state. There are 2 (two) syntaxes that Atlas understands and can therefore be used to define a “state”. The Atlas HCL language and SQL. So we can supply two inputs to Atlas, input1 in HCL or SQL format and input2 in HCL or SQL format and Atlas can generate an execution plan that will take the database from the state in input1 to the state in input2.
Step 3.1 - Declaring the Current State To Atlas
To declare the current state of our database (that we don’t have yet, I know, relax) to Atlas in the versioned approach, we need to point Atlas to the directory that contains all our previous versioned files and we also need a Dev Database. The Dev Database is different from the target database. The target database is the database we want to update (the staging or production database) while the dev database is a temporary database that Atlas uses to validate migration files. Atlas also uses the Dev Database to execute all existing migration files to determine the current state and so much more.
Therefore we need to first create our migration directory. We simply create a migrations folder in the root of our application:
$ mkdir migrations
Then for the dev database, we can configure Atlas to spin up a postgres docker container for the dev database but for this tutorial, we will define our dev database using docker compose.
Let’s create a docker-compose.yml file in the root of of application with the following:
version: "3.8"
services:
  devdb:
    image: postgres:15.3
    container_name: devdb
    environment:
      - POSTGRES_PASSWORD=tdb
      - POSTGRES_DB=tdb
      - POSTGRES_USER=tdb
We defined a service devdb that will provide us with a postgres:15.3 docker container and for the sake of simplicity we define our database credentials directly in the yml file (Don’t do this in your actual project).
Next, we configure Atlas to use our migration directory and the provided dev db. Let’s create another file atlas.hcl in the same directory. When we run Atlas in this directory, Atlas will by default look for its configuration in this file. Let’s define the following in the file:
env "dev" {
    dev = "postgres://tdb:tdb@devdb:5432/tdb?search_path=public&sslmode=disable"
    migration {
        dir = "file://migrations?format=goose"
    }
    format {
        migrate {
            diff = "{{ sql . \"  \" }}"
        }
    }
}
We defined an environment called dev. An environment is simply a way to group configurations together and we can specify the environment using the --env flag. In our dev environment we configured the dev database using the dev key and we also configured our migration directory using the migration block. The format=goose tells Atlas to output our migration files in the format that Goose understands. The format block tells Atlas to indent our SQL by two spaces when outputting the plan.
We have now configured our current state, or in more accurate terms “We have provided Atlas with the details necessary for it to determine the current state of the database”
Step 3.2 - Declaring the Desired State to Atlas
Atlas only understands HCL and SQL but our desired state is defined as Gorm models. Remember the atlas-provider-gorm library we installed? this is where it comes in. This library takes Gorm models and outputs the SQL statements for the models. This is one reason why Atlas is so powerful and can be used with almost any ORM. As long as you are able to generate SQL statements or HCL that represent the current state of those models.
To configure the desired state we can either provide the SQL statements or HCL configuration, or in our case tell Atlas to execute a program that will output SQL statements that it should use as the desired state.
First, let’s write this program. Create a cmd directory in our application root and in that directory create another directory atlasloader and finally create a main.go in that folder. So we would have cmd/atlasloader/main.go. Now our program:
package main

import (
    "ariga.io/atlas-provider-gorm/gormschema"
    "github.com/Shaibujnr/atlasgoose/models"
    "io"
    "log/slog"
    "os"
)

func main() {
    stmts, err := gormschema.New("postgres").Load(&models.User{}, &models.BlogPost{})
    if err != nil {
        slog.Error("Failed to load gorm schema", "err", err.Error())
        os.Exit(1)
    }
    _, err = io.WriteString(os.Stdout, stmts)
    if err != nil {
        slog.Error("Failed to write gorm schema", "err", err.Error())
        os.Exit(1)
    }
}
This is a simple go program that we can execute. We import the gormschema package from atlas-provider-gorm and we use it to load our gorm models and then write the generated SQL to Stdout. When the application grows and we define more models, we need to update this program to load those models as well.
Now we need to configure Atlas to run this program and capture the SQL statements from the Stdout. Let’s update our atlas.hcl.
data "external_schema" "gorm" {
  program = [
    "go",
    "run",
    "-mod=mod",
    "./cmd/atlasloader",
  ]
}

env "dev" {
  src = data.external_schema.gorm.url
  dev = "postgres://tdb:tdb@devdb:5432/tdb?search_path=public&sslmode=disable"
  migration {
    dir = "file://migrations?format=goose"
  }
  format {
    migrate {
      diff = "{{ sql . \"  \" }}"
    }
  }
}
We have defined a data block of type external_schema called gorm. This is simply telling Atlas how to get an SQL schema from an external program. Using the program key we tell Atlas what external program to execute to get the SQL schema.
We also update our dev environment with a new key src. The src key points to the desired state of the database which is the gorm external_schema we’ve defined.
With this configuration, we have now defined both our current state and desired state.
Step 3.3 - Generate the Migration File
To generate the migration file we need to run atlas migrate diff create_users_and_blog_posts –-env dev. But for this command to work we need to have atlas installed 🌚. We can directly install atlas on our machine following this guide, however, I prefer having it installed in docker. So let’s define the dockerfile for our application with atlas installed. First, create the dockerfile in the application root and then the following:
FROM golang:1.21.3-alpine
RUN apk --no-cache add curl && curl -sSf https://atlasgo.sh | sh
WORKDIR /code
COPY go.mod go.sum ./
RUN go mod download
COPY . .
We use the official golang:1.21.3-alpine image and then we first install curl, then we run curl -sSf https://atlasgo.sh | sh to install atlas. We change our work directory, copy our go.mod and go.sum files into our working directory, and then we install all dependencies. Lastly, we copy all source files to our working directory. Very simple and straightforward dockerfile 🙂.
Next, we update our docker-compose.yml file to user the dockerfile and we can then enter the container shell to run atlas commands:
version: "3.8"
services:
  app:
    build:
      context: .
      dockerfile: dockerfile
    volumes:
      - .:/code
    depends_on:
      - devdb
  devdb:
    image: postgres:15.3
    container_name: devdb
    environment:
      - POSTGRES_PASSWORD=tdb
      - POSTGRES_DB=tdb
      - POSTGRES_USER=tdb
Our docker-compose file now has an app service that will run our image. The app service mounts our project root onto /code (the Workdir) and it depends_on devdb so that the devdb will always launch whenever we run the app service.
Next let’s build and launch our app container, enter the shell and generate our migration file:
$ docker compose build
$ docker compose run app sh
$ atlas migrate diff create_users_and_blog_posts --env dev
Atlas would check the migrations directory, see that it’s empty and determine that our current state is blank, then it will get the desired state from the gorm program. It will then plan how to get the database from a blank state to the desired state and output the SQL statements in a file [currentdatetime]_create_users_and_blog_posts.sql in the migrations folder. The [currentdatetime] is the date and time the migration was generated, and the rest of the filename is from the name we provided when executing the command. Along with that, Atlas will create an atlas.sum file in the migration folder. This is just like the go.sum file and basically stores the hash of all generated files. Using the hash, Atlas can tell if any of the migration files it generated were modified.
The content of the generated SQL file will look like this:
-- +goose Up
-- create "users" table
CREATE TABLE "users" (
  "id" bigserial NOT NULL,
  "created_at" timestamptz NULL,
  "updated_at" timestamptz NULL,
  "deleted_at" timestamptz NULL,
  "first_name" text NOT NULL,
  "last_name" text NOT NULL,
  "email" text NOT NULL,
  PRIMARY KEY ("id")
);
-- create index "idx_users_deleted_at" to table: "users"
CREATE INDEX "idx_users_deleted_at" ON "users" ("deleted_at");
-- create index "users_email_key" to table: "users"
CREATE UNIQUE INDEX "users_email_key" ON "users" ("email");
-- create "blog_posts" table
CREATE TABLE "blog_posts" (
  "id" bigserial NOT NULL,
  "created_at" timestamptz NULL,
  "updated_at" timestamptz NULL,
  "deleted_at" timestamptz NULL,
  "title" text NOT NULL,
  "content" text NOT NULL,
  "user_id" bigint NOT NULL,
  PRIMARY KEY ("id"),
  CONSTRAINT "fk_users_blog_posts" FOREIGN KEY ("user_id") REFERENCES "users" ("id") ON UPDATE NO ACTION ON DELETE NO ACTION
);
-- create index "blog_posts_title_key" to table: "blog_posts"
CREATE UNIQUE INDEX "blog_posts_title_key" ON "blog_posts" ("title");
-- create index "idx_blog_posts_deleted_at" to table: "blog_posts"
CREATE INDEX "idx_blog_posts_deleted_at" ON "blog_posts" ("deleted_at");

-- +goose Down
-- reverse: create index "idx_blog_posts_deleted_at" to table: "blog_posts"
DROP INDEX "idx_blog_posts_deleted_at";
-- reverse: create index "blog_posts_title_key" to table: "blog_posts"
DROP INDEX "blog_posts_title_key";
-- reverse: create "blog_posts" table
DROP TABLE "blog_posts";
-- reverse: create index "users_email_key" to table: "users"
DROP INDEX "users_email_key";
-- reverse: create index "idx_users_deleted_at" to table: "users"
DROP INDEX "idx_users_deleted_at";
-- reverse: create "users" table
DROP TABLE "users";
We can see the -- +goose Up and -- +goose Down comments. This is how goose migration files look like and atlas outputted the statements in this format because we configured it to.
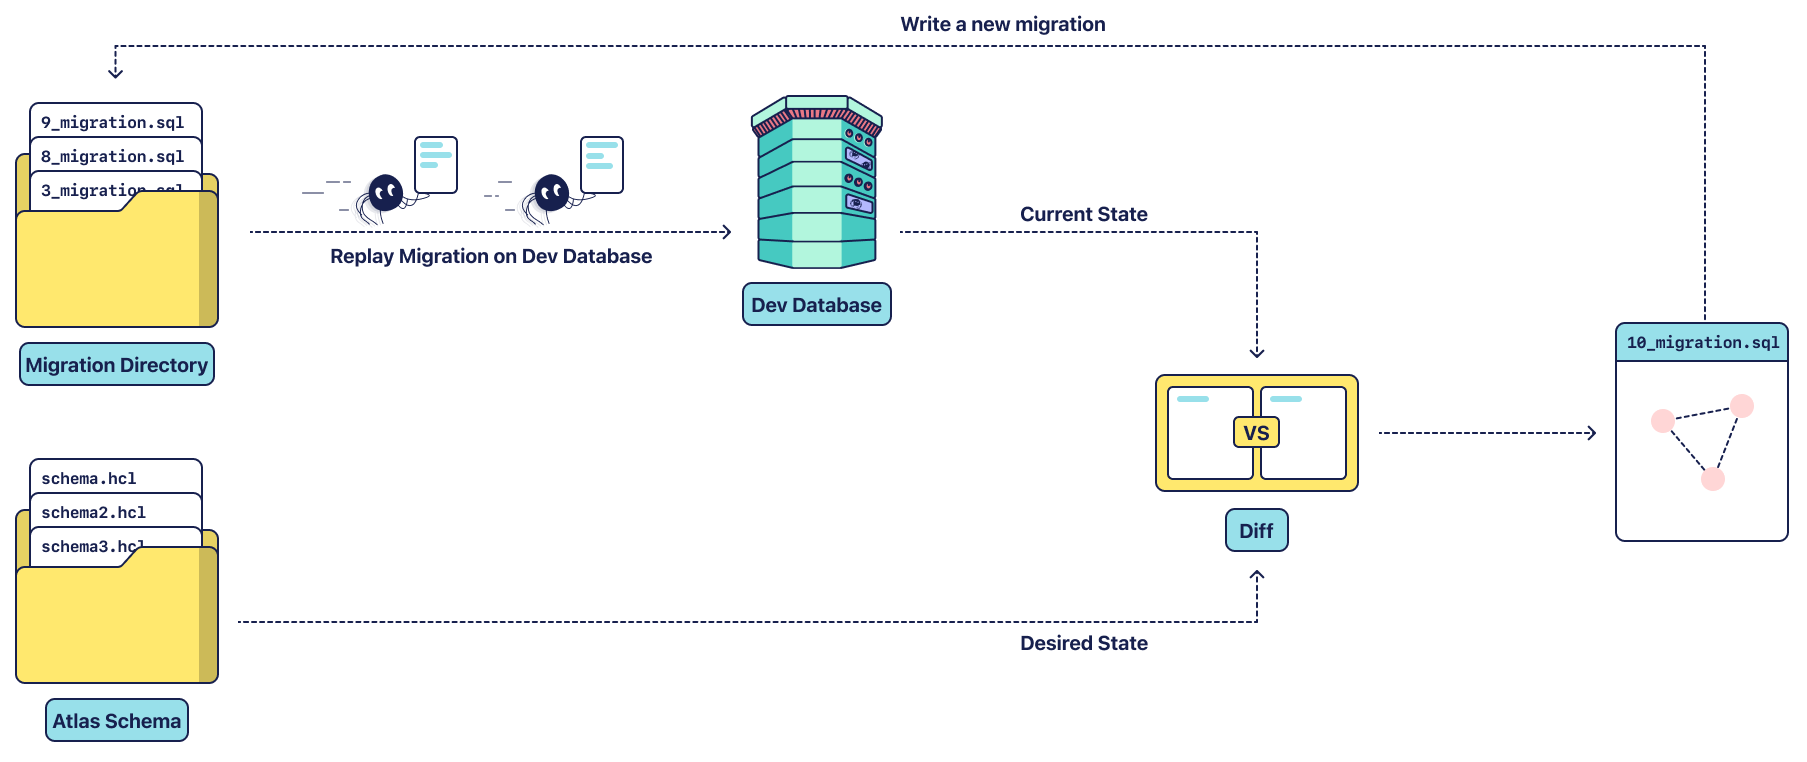
We have successfully generated our first migration file using Atlast 🥳. Here is a nice image directly from the Atlas docs that shows the entire Atlas flow. Only In our case, Atlas Schema is an external program that outputs SQL Statements.
Step 4 - Apply the Migration With Goose
Now we have our migration file, we can review the statements that will be executed on the target database, ensure they are exactly what we want, check the file into version control, and have other team members review it before applying it. To apply the migration we first need a target database, this is the actual database our application is using. It could be the local development database, staging database or even production database and then we run goose up. We also need to install and configure Goose for this to work.
Step 4.1 - Set up Target Database
Let’s update our docker-compose file to add another database, this would serve as our target database. Declare the following service in docker-compose.yml:
db:
  image: postgres:15.3
  container_name: db
  volumes:
    - ./dbdata:/var/lib/postgresql/data/
  ports:
    - "5432:5432"
  environment:
    - POSTGRES_PASSWORD=tdb
    - POSTGRES_DB=tdb
    - POSTGRES_USER=tdb
We use the same image as the dev database and we mount a volume dbdata from our project root into the postgres database. You can create this dbdata folder manually. We map port 5432 on our local machine to the database so we can connect using a database client on our local machine. We define the database credentials directly in the compose file keeping it simple.
Step 4.2 - Install and Configure Goose
We can install Goose directly on our machine, but just like Atlas, we will install it in our app dockerfile. Add this directly above/below the line we installed Atlas on:
RUN go install github.com/pressly/goose/v3/cmd/goose@latest
Let’s configure Goose. Update the app service in our docker-compose.yml file:
app:
  build:
    context: .
    dockerfile: dockerfile
  volumes:
    - .:/code
  depends_on:
    - db
    - devdb
  environment:
    GOOSE_DRIVER: "postgres"
    GOOSE_DBSTRING: "user=tdb host=db password=tdb port=5432 dbname=tdb"
We add the db service to the depends_on block so that the target database will run before the app, and we configure Goose with the environment variables. Whenever we run a goose command, Goose will know what database to connect to using these environment variables.
Let’s build our app image again since we’ve updated the dockerfile
$ docker compose build
Step 4.3 - Apply Migrations
To apply the migration we enter the app container shell again with:
$ docker compose run app sh
And then we change into our migrations directory and apply the migrations:
$ cd migrations
$ goose up
We should see a message that our migration is successfully applied to our database. We can use a Postgres database client to connect to the db database and we should see the users and blog_posts tables.
Step 5 - Seed the database
We have migrated our database and deployed our application to production. A number of users have signed up and created blog posts. Let’s mimic this by inserting some records into the users and blog_posts table.
Create another directory in the cmd directory, let’s call it seeder. Inside the seeder directory, create the main.go file and populate this file with the following:
package main

import (
    "fmt"
    "github.com/Shaibujnr/atlasgoose/models"
    "github.com/brianvoe/gofakeit/v6"
    "gorm.io/driver/postgres"
    "gorm.io/gorm"
)

func createUser(db *gorm.DB, firstName, lastName, email string) (*models.User, error) {
    user := &models.User{
        FirstName: firstName,
        LastName:  lastName,
        Email:     email,
    }
    result := db.Save(user)
    if result.Error != nil {
        return nil, result.Error
    }
    return user, nil
}

func addBlogPost(db *gorm.DB, userID uint, title, content string) (*models.BlogPost, error) {
    blogPost := &models.BlogPost{
        UserID:  userID,
        Title:   title,
        Content: content,
    }
    result := db.Save(blogPost)
    if result.Error != nil {
        return nil, result.Error
    }
    return blogPost, nil
}

func main() {
    dsn := "host=db user=tdb password=tdb dbname=tdb port=5432"
    db, err := gorm.Open(postgres.Open(dsn), &gorm.Config{})
    if err != nil {
        panic(err)
    }
    db.Transaction(func(tx *gorm.DB) error {
        for u := 0; u < 5; u++ {
            firstName := gofakeit.FirstName()
            lastName := gofakeit.LastName()
            email := gofakeit.Email()
            user, err := createUser(tx, firstName, lastName, email)
            if err != nil {
                panic(err)
            }
            for i := 0; i < 10; i++ {
                title := fmt.Sprintf("Title%d-%s", i, gofakeit.SentenceSimple())
                content := gofakeit.Sentence(500)
                _, err := addBlogPost(tx, user.ID, title, content)
                if err != nil {
                    panic(err)
                }
            }
        }
        return nil
    })

}
We defined 2 (two) functions, createUser function to insert a user into the database and also addBlogPost function to insert a blog post into the database. In our main function, we initialized the database client, and we started a database transaction to insert records into our database. We inserted 5 (five) users into the database. For each user we created a fake first name, fake last name, and fake email, we also inserted 10 (ten) blog posts for each user, each blog post with a title created using a fake sentence and then the content of the blog post is a fake 500 (five hundred) word sentence.
Let’s execute this code to insert records in our database:
$ docker compose run app sh
$ go run cmd/seeder/main.go
Step 6 - Update our Desired State
We have existing users and blog posts in our database. However a new feature request came in, our blogging application needs to support tags, users want to be able to tag their blog posts (e.g golang, atlas, goose, programming, python etc) as a way to categorize the posts and also so that readers can search for posts by tags.
We decided to update our BlogPost model, we defined a new property Tags for simplicity. This would be a string and we would store tags as words separated by spaces. Also, every blog post should have at least one tag therefore the tags column is not nullable.
Step 6.1 - Update the BlogPost Model
Let’s update our BlogPost model to support tags.
type BlogPost struct {
    gorm.Model
    Title   string `gorm:"column:title;not null;unique"`
    Tags    string `gorm:"column:tags"`
    Content string `gorm:"column:content;not null"`
    UserID  uint   `gorm:"column:user_id;not null;"`
}
Although the requirement is that tags are non-nullable, we can’t directly make that change because our users have been using the platform and we have existing blog posts that of course don’t have any tags. So this particular change will require 3 migration files:
- Schema migration to add the new
tagscolumn but it should be nullable - Data migration to fill the
tagscolumn for all existing blog posts since every blog post must have at least one tag. - Lastly, another schema migration to update the
tagscolumn fromnullabletonon-nullable.
Step 6.2 - Generate Schema Migration
We have updated our desired state and now we need to generate the migration file for that change. We already know how to do this:
$ docker compose run app sh
$ atlas migrate diff add_tags_column --env dev
This will create a new migration file in the migrations folder with the following content
-- +goose Up
-- modify "blog_posts" table
ALTER TABLE "blog_posts" ADD COLUMN "tags" text;

-- +goose Down
-- reverse: modify "blog_posts" table
ALTER TABLE "blog_posts" DROP COLUMN "tags";
It will also update the atlas.sum file.
Step 6.3 - Apply the Migration
$ docker compose run app sh
$ goose up
Step 7 - Data migration with go migration file
We have now added the tags column to our blog_posts table, however, the existing blog posts have no entry in that column but the requirement is for the tags column to be non-nullable and for every blog post to have at least one tag. To achieve this we need to fill the tags column for the existing blog post.
Step 7.1 - Generate the Go Migration File
We can create a go migration file using goose in our migrations directory:
$ docker compose run app sh
$ cd migrations
$ goose create fill_tags_column go
This will create a version file in the migrations folder with the exact same pattern as atlas only this time the file will be a go file [datetimecreated]_fill_tags_column.go. The migration file will have 3 (three) functions predefined in it:
- The
initfunction to register our upgrade and downgrade functions with goose upFillTagsColumnfunction will be executed to apply this migrationdownFillTagsColumnfunction will be executed to reverse this migration
Since we want our migration to fill up all existing tag columns, how do we determine what to fill in? We could use some advanced machine-learning algorithm to process the content of each blog post and then the algorithm will give us tags based on the content, and then we can insert those tags into the tags column for each blog post. Or, for the sake of this tutorial:
- First we automatically tag all existing blog posts with
basic, why? Because we don’t have an advanced machine learning algorithm and since every post must have at least one tag, this will ensure every post at least has thebasictag. - To make it more interesting, so we don’t end up with just
basicin every row, let’s implement a simple algorithm that will insert more tags into thetagscolumn for each blog post based on the content.- We simply define a predefined slice of tags that we support
- For each blog post we loop through each tag in our supported tags
- If we find the tag in the content of the blog post, we add it to the tags for the post. This can serve as our own advanced machine-learning algorithm to determine the appropriate tags of a post 😀.
Step 7.2 - Implement the Migration to Fill the Tags Column
Let’s update our migration file:
package migrations

import (
    "context"
    "database/sql"
    "errors"
    "github.com/pressly/goose/v3"
    "log/slog"
    "strings"
)

var (
	SUPPORTED_TAGS = []string{"golang", "food", "science", "animal", "dog", "cat", "tech", "life", "fun", "book"}
)

func init() {
	goose.AddMigrationContext(upFillTagsColumn, downFillTagsColumn)
}

func getTags(content string) string {
    result := "basic"
    words := strings.Split(content, " ")
    for _, word := range words {
        for _, tag := range SUPPORTED_TAGS {
            if strings.Contains(word, tag) {
                result += " " + tag
            }
        }
    }
    return result
}

func upFillTagsColumn(ctx context.Context, tx *sql.Tx) error {
    // This code is executed when the migration is applied.

    // create a cursor for fetching the blog posts
    _, err := tx.ExecContext(ctx, `DECLARE posts_cursor CURSOR FOR SELECT id, content FROM blog_posts;`)
    if err != nil {
        panic(err)
    }

    // defer closing the cursor
    defer func() {
        _, err := tx.ExecContext(ctx, "CLOSE posts_cursor;")
        if err != nil {
            panic(err)
        }
    }()

    var id uint
    var content string

    for {
        err := tx.QueryRowContext(ctx, "FETCH NEXT FROM posts_cursor").Scan(&id, &content)
        if err != nil {
            if errors.Is(err, sql.ErrNoRows) {
                break
            }
            slog.Error("Fetching next row failed", "err", err.Error())
            panic(err)
        }
        tags := getTags(content)
        _, err = tx.ExecContext(ctx, "UPDATE blog_posts SET tags=$1 WHERE id=$2;", tags, id)
        if err != nil {
            slog.Error("Unable to update row", "err", err.Error())
            panic(err)
        }
    }
    return nil
}

func downFillTagsColumn(ctx context.Context, tx *sql.Tx) error {
	// This code is executed when the migration is rolled back.
	return nil
}
We defined a variable to hold our SUPPORTED_TAGS. We also defined a function getTags that will check for each support tag in the blog post content and return the tags found in the blog post content. In the upFillTagsColumn function we fetched every blog post using a cursor and for each blog post, we got the tags using the getTags function and then we updated the blog post with the tags.
Also for this tutorial, we are not really concerned about reversing this migration therefore we don’t update the downFillTagsColumn function.
Step 7.3 - Define Custom Goose Binary
We have our data migration file and we need to apply it. You might think to apply it we simply need to run goose up like we have done previously. However, this is not entirely the case. Because we now have a go migration file, we need to create a custom goose binary that will have these go migration files built into it. You can find more information about this here and you can also go through the example to understand how to create one. I won’t go into much detail about how to create a custom binary here, you can read all about it on the goose documentation.
Let’s create another folder in our cmd folder called dbmigrate and in that folder, create a main.go file. Let’s have the following in the main.go file:
package main

import (
    "context"
    "flag"
    "github.com/Shaibujnr/atlasgoose/migrations"
    "github.com/pressly/goose/v3"
    "gorm.io/driver/postgres"
    "gorm.io/gorm"
    "log"
    "log/slog"
    "os"
)

var (
    flags = flag.NewFlagSet("goose", flag.ExitOnError)
    dir   = flags.String("dir", ".", "directory with migration files")
)

func main() {
    err := flags.Parse(os.Args[2:])
    if err != nil {
        panic(err)
    }

    args := flags.Args()
    slog.Info("Args are", "args", args, "dir", *dir)
    if len(args) < 1 {
        flags.Usage()
        return
    }

    command := args[0]

    dsn := "host=db user=tdb password=tdb dbname=tdb port=5432"
    db, err := gorm.Open(postgres.Open(dsn), &gorm.Config{})
    if err != nil {
        panic(err)
    }

    sqlDB, err := db.DB()
    if err != nil {
        panic(err)
    }

    defer func() {
        if err := sqlDB.Close(); err != nil {
            panic(err)
        }
    }()

    arguments := make([]string, 0)
    if len(args) > 1 {
        arguments = append(arguments, args[3:]...)
    }

    if err := goose.RunContext(context.Background(), command, sqlDB, *dir, arguments...); err != nil {
        log.Fatalf("goose %v: %v", command, err)
    }
}
This is a simple command line application using flags with a sub command called goose. We import our migrations package so that when we build this program the go files in the package will be built along with it. Our command line application defines a -dir flag for the location of the migrations directory but it defaults to the current directory. Every other command line argument is passed to the goose.RunContext function. You can learn more about creating command line applications using flags here.
Step 7.4 - Build our Custom Goose Binary
To build our custom goose binary we simply need to build the main.go file. Let’s update our dockerfile to build it. Add the following lines to our dockerfile after the Copy statement:
RUN go build -o migrator ./cmd/dbmigrate
RUN mv migrator $GOPATH/bin/migrator
This will build the file and output the executable as migrator and we move this output file to the $GOPATH/bin so that we can call migrator from anywhere in our container’s shell.
Again, let’s rebuild our image since we updated the dockerfile:
$ docker compose build
Step 7.5 - Apply migration
We now have our custom goose binary. We can apply our go migration:
$ docker compose run app sh
$ migrator goose -dir=migrations/ up
We use our command line application to apply the migration and we should see that the migration was applied successfully. Using your database client, you can check the blog_posts table and you should see that it has now filled all tags columns with tags with each record having at least the basic tag.
Step 8 - Make the tags column non-nullable
Since all our blog posts now have at least one tag, we can safely set the tags column to not null. To do this, first, we update our model by adding not null to the Tags struct tag. Then we generate the schema migration using Atlas:
$ docker compose run app sh
$ atlas migrate diff make_tags_non_nullable --env dev
This should generate an SQL migration version in our migration folder. Lastly, we apply the migration using our custom goose binary:
$ docker  compose run app sh
$ migrator goose -dir=migrations/ up
This would successfully update our tags column and make it non-nullable completing the database migration for our new feature.
Conclusion
We briefly described Atlas and its use cases. We demonstrated how to use a predefined dev database and migrations folder to determine the current state of the database and also how to use the atlas-provider-gorm module to declare the desired state of the database using Gorm Models. We also demonstrated how to generate the migration file with Atlas and how to apply the migration files with goose. And then we demonstrated how to perform data migrations using the go migration file and how to build a custom goose binary to apply the go migration file. This concludes the tutorial on how to use Atlas and Goose. You can find the full code for this tutorial here.